 Back in June 2019 VMware published a press report on there intent to acquire AVI Networks. AVI Networks was a leader in the multi-cloud application delivery services. VMware has rebranded the load balancing product, it is now called NSX Advanced Load Balancer.
In this article I will describe how to install the NSX Advanced Load Balancer, and configure it for VMware Horizon.
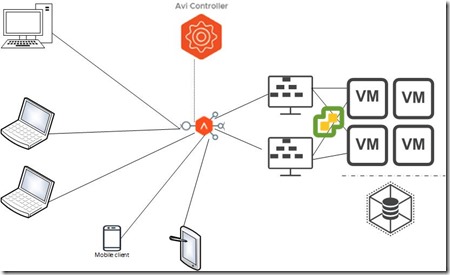
This is the architecture we are going to build.

Install NSX Advanced Load Balancer Controller
Right click on the cluster where you want to install the NSX Advanced Load Balancer controller and choose for Install OVF Template.
Choose for local file and browse to the location where you downloaded the OVF file.
Choose the vCenter folder where you want to deploy the Controller VM.
Choose the ESXi host where you want to deploy the Controller VM.
Verify the details.
Select storage location and select the virtual disk format.
Select the management network for the NSX Advanced Load Balancer Controller VM.
Enter the network config for the management interface for the controller appliance.
Click finish.
When the installation finished and you have powered on the controller VM browse to the IP address you have entered during the installation. Create the admin account by entering the password you want to use.
Enter the security passphrase and the DNS info for your environment.
I choose to not configure the email settings at this time.
Enter your Multi-Tenant settings, tick the box that says “Setup Cloud After” and click on save.
Edit the Default Cloud by selecting “VMware vCenter/vSphere ESX”.
Enter the connection details to the vCenter managing the environment where you want to deploy the Service Engine VMs. Make sure you have set the permission for the connection to “Write” otherwise you won’t be able to deploy Service Engine VMs.
Next up we will create a LB instance.
You need to name in instance, add the FQDN, Application Profile and services you wand to deliver.
As a part of the new virtual service you need to create a Server Pool.
We choose to select the servers that will be part of Server Pool based on the network.
NSX Advanced Load Balancer has read all the available networks from vCenter.
You can filter the output so you can easily find the devices you require.
At the end of the wizard you can see that the various components are created.
In vCenter you can see that the required Service Engines are created. Because the NSX Advanced Load Balancer Controller has write access to vCenter it can create the NSX Service Engines within the vCenter environment.
By default the Service Engines are placed within a vCenter folder called AviSeFolder.
When we enter the FQDN for the Load Balancer instance in a browser we are presented with the HTML Access page of the underlying VMware Horizon Connection Servers.


